***
Turkuterie: Your New Favorite Thanksgiving Charcuterie Turkey
Let’s Make a Snack That’s Almost Too Cute to Eat! (Almost.)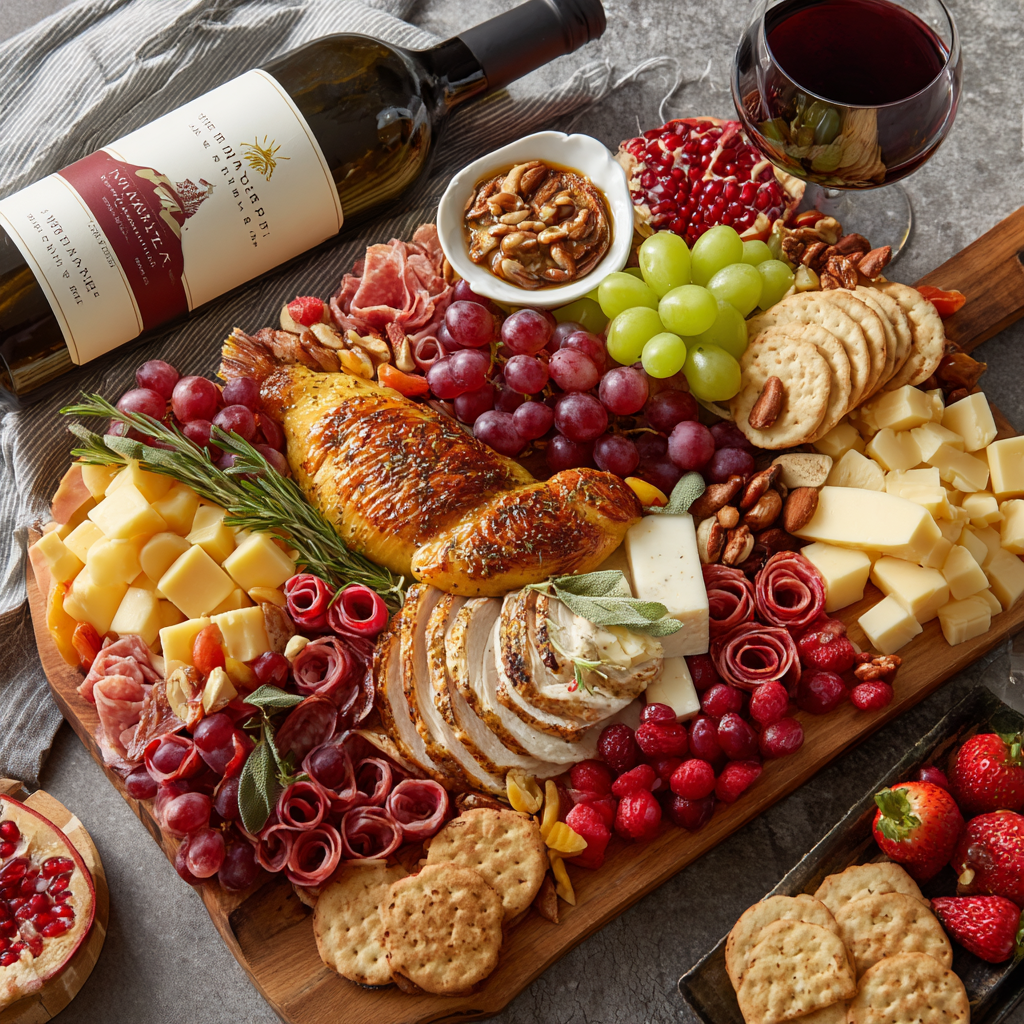
Hello, my friend! Anna here. Can we talk about that magical, chaotic, and utterly delicious stretch of time just before the Thanksgiving feast hits the table? The house is filled with that incredible roast-turkey-and-herbs aroma, your favorite playlist is on, and laughter is spilling from the living room. But there’s also a quiet, collective hunger building. You know the one. It’s the sound of stomachs rumbling as your guests start to casually—and I mean very casually—drift towards the kitchen, asking that age-old question: “Is there anything I can snack on?”
For years, my answer was a hurried bowl of store-bought chips or a hastily-opened tub of hummus. It felt… underwhelming. This is the kickoff to our coziest, most food-centric holiday! The pre-game show deserves its own fanfare. I wanted a starter that was as festive, warm, and welcoming as the day itself, but didn’t add a single ounce of stress to my already-busy kitchen schedule.
And that, my friends, is how our beloved “Turkuterie” was born. It’s a show-stopping, conversation-starting, utterly delightful charcuterie board styled to look like a proud little turkey. It’s bursting with cured meats, creamy cheeses, fresh fruits, and crunchy bits—a perfect pre-dinner bite that keeps everyone happy and out from underfoot while you put the finishing touches on the main event. It’s joyful, it’s creative, and I promise, it’s so much easier to assemble than it looks. So, grab your biggest board and let’s turn snack time into the first celebration of the day!
The Year the Appetizer Stole the Show
PrintTurkuterie – The Thanksgiving Charcuterie Turkey
When your guests are circling the kitchen, noses in the air, waiting for the turkey to finish roasting—give them a snack that’s as festive as it is flavorful. Enter the Turkuterie: a show-stopping charcuterie board styled like a turkey, bursting with cured meats, cheeses, fresh fruits, and crunchy extras. It’s the pre-dinner centerpiece that feeds and wows.
- Prep Time: 25–30 mins
- Total Time: 25–30 mins
Ingredients
What You’ll Need (Serves a crowd)
Cheeses
• Aged cheddar, cubed
• Brie wedges or rounds
• Manchego or gouda slices
Cured Meats
• Salami or pepperoni, folded into rosettes
• Prosciutto or ham, loosely draped
Fruits
• Red & green grapes
• Apple or pear slices (brush with lemon juice)
• Berries (cranberries, strawberries, or raspberries)
• Dried apricots or figs
Extras
• Crackers or breadsticks (fan them for “feathers”)
• Roasted nuts (almonds, pecans)
• Olives or pickles
• Fresh herbs for garnish (rosemary, sage)
For the “Turkey Face”
Mini wheel of brie or a small round fruit for the head
• Blueberries or olives for eyes
• A strip of red bell pepper for the wattle
• Cheese triangle or carrot slice for the beak
Instructions
Build the body: Use a round cheese or fruit in the center bottom of a large board for the turkey’s head. Add the beak, eyes, and wattle using small sliced ingredients.
Fan the feathers: Radiate crackers, meats, fruits, and cheese slices upward and outward from the “body” in layered rows to form the tail. Alternate colors and textures for visual pop.
Fill in: Tuck in nuts, herbs, and small extras to fill gaps and add a lush, full look.
Serve: Provide small plates, toothpicks, and festive napkins.
Nutrition
- Calories: ~150–200 per small plate
I have to share a quick story with you. A few years back, my then five-year-old niece, Lily, was my official “Thanksgiving Helper.” Her job was to arrange the rolls in a basket, a task she took with the utmost seriousness. But as the turkey-roasting timer ticked down, I saw her little face fall. “Aunt Anna,” she whispered, “everyone is just waiting for the big turkey. It’s taking so long.”
I looked at the platter of cheese and crackers I was about to set out and knew it wouldn’t cut it. In a moment of pure, playful desperation, I grabbed a round of brie. “Lily,” I said, “we’re not just making a snack. We’re making a baby turkey for everyone to eat while the big one cooks.” Her eyes went wide. We spent the next twenty minutes in a whirlwind of giggles, using pepperoni for feathers, a bell pepper scrap for a wattle, and olive slices for eyes. When we presented our “Turkuterie” to the family, the room erupted in cheers. Lily beamed with pride, and that little cheesy turkey was the talk of the dinner. It wasn’t just food; it was a memory we created together, and it’s been our non-negotiable tradition ever since.
Gathering Your Turkuterie Flock
The absolute best part about this project is its flexibility. Think of this list as a joyful inspiration, not a rigid rulebook! Raid your fridge, hit the grocery store, and use what you love. The goal is a beautiful mix of colors, textures, and flavors.
- Aged Cheddar, cubed: A sharp, robust cheese that stands up well to the other flavors. Chef’s Insight: Cubing it ahead of time makes it super easy for guests to grab. Don’t have cheddar? Smoked gouda or a firm havarti would be lovely here!
- Brie wedges or a small round: For that creamy, luxurious element that feels so festive. Substitution Tip: If you have brie-haters in the crowd (we don’t judge!), Camembert is a perfect swap, or even a log of creamy goat cheese.
- Manchego or Gouda slices: I love the slightly nutty, buttery notes these bring. Slicing them into little wedges or triangles adds a great shape for our “feathers.”
- Salami or Pepperoni, folded: These are the workhorses for creating those gorgeous, ruffled “rosettes” that look like feathers. Chef’s Hack: Fold a slice over the rim of a glass or small bowl to give it a perfect curve, then layer a few together in a pinwheel shape.
- Prosciutto or Ham, loosely draped: The delicate, silky texture is a wonderful contrast to the firmer salami. Just drape or roll it loosely for a soft, flowing look.
- Red & Green Grapes: A classic for a reason! They add juicy sweetness and a gorgeous pop of seasonal color. The green grapes especially mimic the look of fresh, dewy produce.
- Apple or Pear Slices: Their crispness is so refreshing! Pro-Tip: To keep them from browning, give them a quick spritz with lemon juice right after slicing.
- Berries (Cranberries, Strawberries, Raspberries): These are your color powerhouses! Fresh cranberries are especially festive and add a beautiful deep red.
- Dried Apricots or Figs: They offer a chewy texture and concentrated sweetness that pairs beautifully with the salty cheeses and meats.
- Crackers or Breadsticks: The foundation of our “tail feathers!” Fan them out for maximum visual impact. I love using a mix of plain water crackers and something seeded or grainy for texture.
- Roasted Nuts (Almonds, Pecans): They add a essential crunch and toasty flavor. I like to use pecans for a real Thanksgiving vibe.
- Olives or Pickles: Their briny, tangy punch cuts through all the richness perfectly.
- Fresh Herbs for Garnish (Rosemary, Sage): Don’t skip these! They’re the final, fragrant touch that makes the whole board look professionally styled. Sprigs of rosemary make for incredible, aromatic “feathers.”
For the Adorable “Turkey Face”
- Head: A mini wheel of brie, a small apple, or a round cookie cutter piece of cheese.
- Eyes: Whole black olives, blueberries, or even a couple of whole peppercorns.
- Wattle: A thin, curved strip of red bell pepper or a small slice of salami.
- Beak: A small triangle of cheddar, a sliver of carrot, or a single almond.
Building Your Edible Masterpiece, Step-by-Step
Ready to create some magic? Clear off a big space on your counter, put on some music, and let’s build this turkey! I promise, it’s more fun than fuss.
- Lay the Foundation for the Body. Start by placing your chosen “head” at the center bottom of your largest board or platter. This is your anchor! Now, take a step back and visually map out a large, sweeping arc above it—this will be the space for your magnificent tail. Chef’s Tip: Don’t be afraid to go big! A common mistake is making the tail too small. Use the entire top half of your board for those glorious feathers.
- Create the Sweet Little Face. This is the part that gives our turkey its personality! Gently press your “eyes” onto the head. Add the “beak” just below them, and then drape the “wattle” underneath. Step back and admire your handiwork. Is he looking cheerful? Mischievous? Adjust until you love his expression. Chef’s Hack: If you’re using a soft cheese like brie for the head, you can use a tiny dab of cream cheese as “glue” to hold the facial features in place.
- Fan Out the Tail Feathers—This is Where the Magic Happens! Now, starting from the area just behind the head, begin building your tail upwards and outwards in layered, curved rows. I like to start with the largest, most structural elements first. Create a base layer with your fanned-out crackers and breadsticks. Then, layer in your salami and prosciutto rosettes, followed by clusters of cheese slices and cubes. Chef’s Insight: The key here is to alternate colors and textures. Place a cluster of dark red grapes next to a white cheese, next to a rust-colored salami rosette. This contrast is what makes the board visually pop and look abundantly full.
- Fill in the Gaps and Add Fluff. Once your main tail feathers are in place, it’s time to fill in any empty spots and add volume. Tuck small bowls or clusters of nuts, olives, and berries into the gaps. This is where your fresh herbs come in—tuck sprigs of rosemary and sage throughout the tail to add height, fragrance, and that final “chef’s kiss” of greenery. They look just like the delicate, feathery herbs you’d use to garnish the real turkey!
- Do a Final Once-Over and Serve with Pride! Take one last look at your Turkuterie. Does it look bountiful and balanced? Are there any glaring empty spaces? Fill them with a few extra nuts or berries. Then, proudly carry it to your guests, provide plenty of small plates, cheese knives, and toothpicks, and get ready for the chorus of “oohs” and “aahs.” You’ve just created the first memorable dish of the day!
Presenting Your Prize Turkey
Place your Turkuterie board right in the center of the action—on the coffee table, the kitchen island, or the dining table as a gorgeous centerpiece before the main meal is served. I love putting it next to a bottle of festive wine or a sparkling cider. The beauty of this setup is that it encourages grazing, mingling, and conversation. It’s not just a snack; it’s an experience. Let your guests gather around, admire your handiwork, and dive in!
Make It Your Own: Delicious Turkuterie Twists
This concept is a blank canvas for your culinary creativity! Here are a few fun ways to mix it up:
- The “Everything But the Bird” Board: For a fully vegetarian crowd, skip the cured meats! Load up on a variety of cheeses, roasted vegetables (like cherry tomatoes and asparagus tips), marinated mushrooms, artichoke hearts, and lots of fresh and dried fruits.
- Dessert Turkuterie: Sweeten the deal! Use a round of camembert baked with jam for the head, and create a tail of cookies, chocolate-dipped pretzels, mini tarts, brownie bites, and fresh berries. Drizzle with chocolate or caramel sauce for “feather” details.
- Global Flavors Board: Take a trip around the world! Use Spanish manchego and chorizo, Italian focaccia strips and mozzarella balls, or Mediterranean favorites like feta, hummus, pita chips, and kalamata olives.
- The “Leftover Lover” Board: The day after Thanksgiving, create a mini Turkuterie with all your leftovers! Use slices of turkey (of course!), bits of stuffing formed into balls, cranberry sauce in a small bowl, and leftover roasted vegetables.
Anna’s Final Whispers of Encouragement
Over the years, this recipe has evolved from a last-minute hack into a cherished tradition. The first one was a little lopsided, I’ll admit, but it was made with so much love and laughter that nobody cared. And that’s the real secret ingredient, isn’t it? Don’t stress about making it perfect. If a cracker breaks, just tuck it under a piece of cheese. If your turkey’s face looks a little… surprised… just lean into it! The goal is joy, not perfection.
I’ve found that assembling the board about an hour before guests arrive is the sweet spot. You can prep all your components—cube the cheese, slice the fruit, fold the meats—ahead of time and store them in containers in the fridge. Then, when you’re ready, it’s just a fun, 20-minute assembly job. I always add the crackers very last to ensure they stay perfectly crisp. Most of all, have fun with it! This is the delicious, playful start to a beautiful, gratitude-filled day.
Your Turkuterie Questions, Answered!
I’ve gotten so many wonderful questions about this board over the years. Here are the ones that pop up most often!
Q: How far in advance can I assemble the board?
A: You can prep all your components 1-2 days ahead! Cube cheeses, wash and dry fruits, and fold your meat rosettes. Store everything in separate airtight containers in the fridge. I highly recommend assembling the full board no more than 1-2 hours before serving to keep everything fresh, especially the crackers and apples. If you must assemble it earlier, cover it loosely with plastic wrap and keep it in the fridge, but hold off on adding the crackers until the last minute.
Q: My board looks a little sparse. How can I make it look more abundant?
A: This is a common worry, and the fix is easy! The secret to a lavish-looking board is volume and height. Don’t just lay things flat. Create clusters—a big, lush bunch of grapes looks more abundant than a few scattered ones. Stack cheese slices. Use small bowls or ramekins for items like olives or dips to add height. And don’t forget to tuck in those fresh herbs! They fill space beautifully and make everything look professionally styled.
Q: What’s the best way to fold the salami for the rosettes?
A> It’s simpler than it looks, I promise! For a simple fold, just fold a slice in half, then in half again to create a quarter-circle. For the fancy rosettes, take 4-5 slices of salami and layer them slightly overlapping over the rim of a narrow glass or small jar. Gently push the meat down into the glass to form a cup shape, then invert it onto your board—it will hold its beautiful ruffled shape perfectly!
Q: Help! I need to make this gluten-free and/or nut-free for my guests.
A> No problem at all! For a gluten-free Turkuterie, simply swap the crackers for your favorite GF brand, breadsticks, or even veggie chips. For a nut-free board, replace the nuts with other crunchy elements like pumpkin seeds, sunflower seeds, gluten-free pretzels, or extra roasted chickpeas. Always a good idea to label things for your guests so they can snack with confidence.
A Note on Nourishment
This is a celebratory appetizer meant for joyful grazing! The nutritional value will vary greatly based on the specific ingredients you choose. The beauty of building it yourself is that you can load it up with healthy options like fresh fruits, vegetables, and lean proteins, creating a balanced mix of carbs, fats, and proteins to keep everyone satisfied until the main event.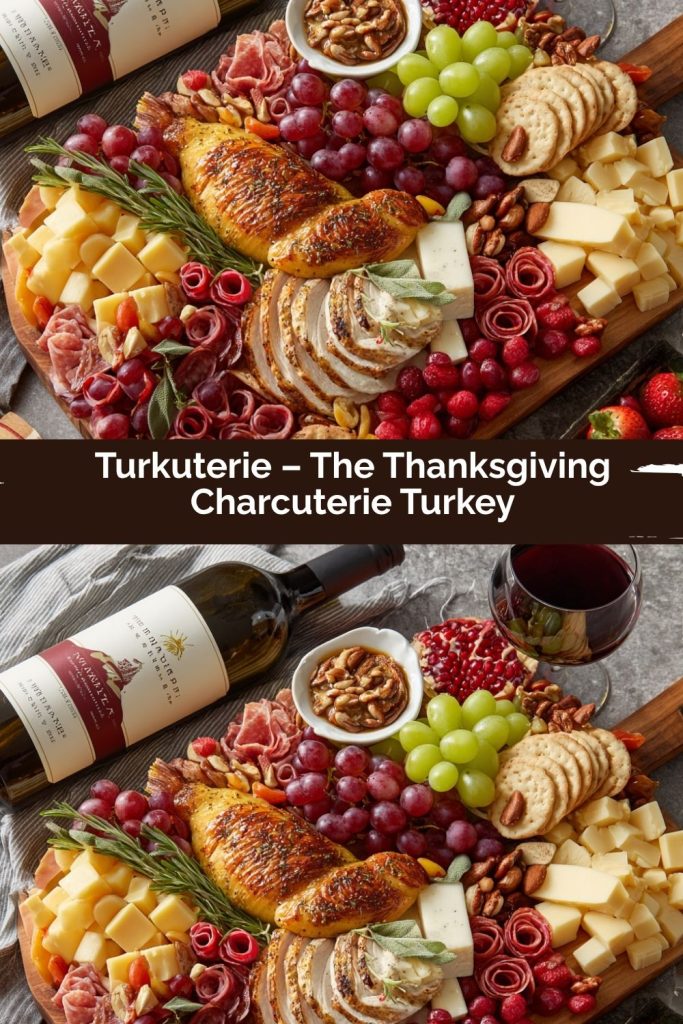
Final Thoughts
At the end of the day, a Turkuterie isn’t really about cheese and crackers—it’s about setting the tone for the holiday. It’s about laughter around the kitchen island, little hands helping with the “turkey face,” and giving guests something to nibble on while the real bird finishes its big moment in the oven.
It doesn’t matter if your turkey looks perfectly polished or a little quirky. In fact, the quirks usually make the biggest memories. What matters is that you created a board that made people smile, gather closer, and feel instantly at home.
So this Thanksgiving, let your Turkuterie be the edible centerpiece that kicks off the day with joy. It’s festive, it’s delicious, and it just might become a new tradition in your house too—one that’s less about perfection and more about connection. And honestly, isn’t that what Thanksgiving is all about?